
Adding LED strip lights can bring some bright vibes to your bedroom or add a pop of color behind your TV, in your camper, or on your RV awning. LED strips have tons of advantages. They run on a super safe low voltage, usually 12V or 24V DC. Plus, they’re thin, flat, and flexible, so you can easily shape them to fit all kinds of lighting designs—around corners, on walls, shelves, TVs, under kitchen cabinets, you name it.
Are LED strip lights easy to install? Installing LED strip lights is a breeze. You might even want to DIY it to bring your color ideas to life. But there are some common mistakes folks tend to make.
This guide will walk you through the proper way to install LED strip lights. It covers all the methods and important tips you need to know to get it right. By the time you’re done reading, you’ll be a pro at installing LED strip lights, step by step.
How to properly install led strip lights
Next up, we’re diving into the nitty-gritty of installing LED strip lights. We’ll walk you through everything—from measuring and cutting the strips, to linking them up, installing connectors, hooking them to the power supply, and more. We’ll dish out some handy installation tips and point out common mistakes you’ll want to steer clear of.
Step 1. Test the led strip lights you get
Before you start installing, it’s smart to give those LED strips a test run. Make sure they’re working right, and that the color and temperature are just what you’re looking for. Also, check that the LED strip lights controller is doing its job and can tweak the lighting effects like you want.
Testing them out beforehand ensures everything’s in order and helps avoid any nasty surprises once the LED strip lights are up. Once those bad boys are stuck on with that 3M adhesive, they’re pretty much there for good. Trying to peel them off later could end up messing them up, or worse, damaging them. Plus, you won’t get as good of a bond if you try to stick them on again with the same adhesive.
Step 2. Clean the surfaces where you will install
Make sure the surfaces you’re sticking the LED strips to are clean and dry for the best adhesion. That means getting rid of any dirt, oil, or other gunk. Once you’ve cleaned everything up, it’ll make installing the strip lights quick and easy. Just wait for the surfaces to dry, and then we can move on to the next steps.
Step 3. Measure the length of led strip lights that you need to install
Next up, let’s measure the length of each section we’re installing. Usually, we gotta cut the LED light strips to fit around corners and stuff. So, jot down those measurements as we’ll need ’em when it’s time to trim the strips later on.
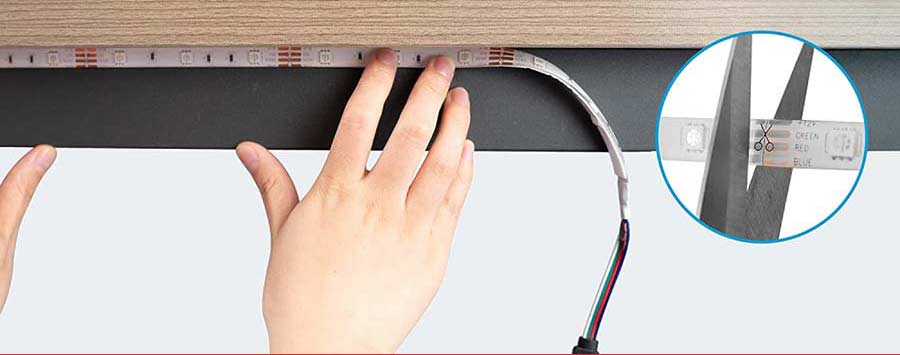
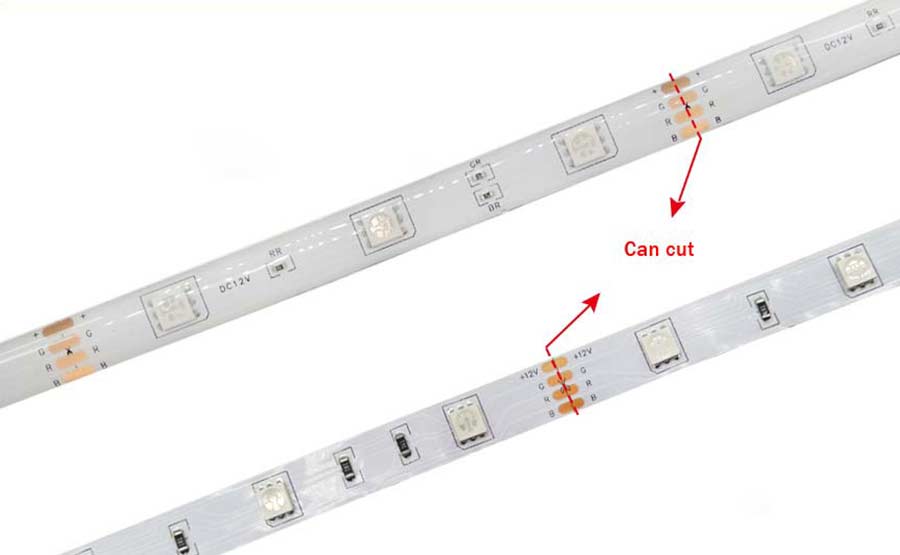
Step 4. How to cut LED strip lights?
Now, it’s time to chop those strip lights to the right length we measured earlier. Cutting LED light strips is a piece of cake. They usually have marked cutting lines every three or six LEDs, making it super easy to snip them to size. These shorter segments are perfect for getting the installation just right.
You will need to cut the led light strips when we get to the point where the led strips should stop. There should be four gold or copper-looking ovals every foot or so. Cut along the middle of those cutting lines on led strips to ensure both cutting ends of the strip light have enough size of copper pads.
Step 5. How to connect LED lights strip together?
After cutting, we gotta hook those LED light strips up to each other. When we’re putting them around corners, we’ll be making some 90-degree connections.
5.1. Connect led light strips with connectors
First, pop open the clip on the connector. Then peel back a bit of the 3M adhesive. Now, slide the end of the LED strip into the connector, making sure the copper pads on the strip line up with the pins in the connector. Snap the lock pad closed to lock it in.
5.2. Repeat the same process to connect another LED strip to the other end of the connector. Make sure the polarities match up right for both the strip light and the connector. If you get ’em wrong, you could end up frying your lights and connectors.
5.3. And remember, when you’re putting LED strip lights around corners, don’t try to twist ’em. Just cut ’em and use L or T-shaped connectors to make those turns.
Step 6. How to connect led strip lights to power supply?
If you’re installing single-color LED strip lights that don’t need a controller, just match up the positive “+” on the LED strips with the positive “+” on the adapter, and do the same with the negative “-” connections. Make sure you get the polarities right, or you could end up frying your LED strips.
Next, hook up the LED strips to the power adapter. It’s easy—just plug the male connector from the power supply into the female connector, then plug the power supply into the wall outlet to get those LED strip lights glowing.
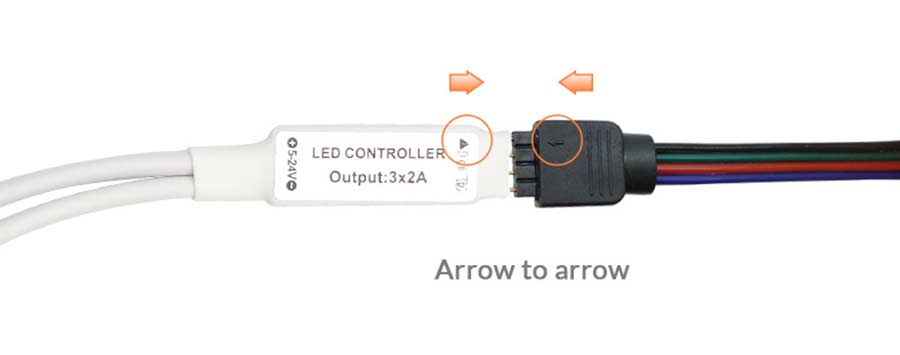
For LED strips that need a controller, first connect the adapter to the corresponding V+ and V- terminals on the controller. Then, hook up the V+ and V- connections on the other side of the controller to the corresponding ends on the LED light strips.
Connect two LED light strips to one power supply
One power supply can juice up two light strips. Just grab a two-way power splitter to connect ’em. But watch out—the wattage of the LED strips shouldn’t go over what the power supply can handle. Usually, LED strip power supplies are under 120W, so each strip can be max 50W.
Now, because of voltage drop and current load, LED strips are built to handle a certain amount of continuous running. This can make it tricky to connect strips in series for longer installations. RGB LED strip lights are usually set to run about 16.4ft(5m) or 32.8ft(10m).
Step 7. How to power LED strip lights?
When it comes to hooking up the power supply, you’ll find three wires for the input terminals on the LED strip: L for live wire, N for neutral wire, and G for ground wire. Just connect those wires to the power supply, and you’re good to go.
Step 8. How to hang led strip lights
This guide will show you two ways to hang LED strip lights: using 3M adhesive tape or mounting brackets.
8.1. Install led strip lights with 3M adhesive tape.
When installing the LED strips, do it 2 feet at a time to avoid them getting tangled or picking up dust. So, peel off about 2 feet of the protective film from the 3M adhesive, stick that section onto the surface, then repeat the process for the next 2 feet, and so on.
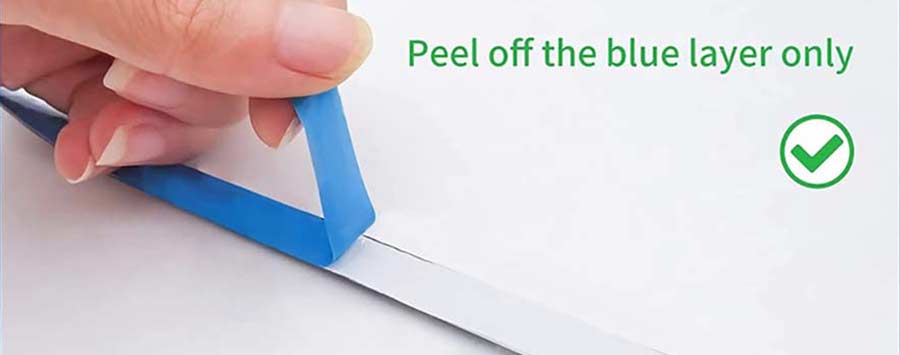
Make sure to press down on the adhesive firmly to get a good bond, but don’t go too hard, especially on the LEDs and resistors. You only want to apply pressure where there are no electronic components.
8.2. Install led strip lights without adhesive
This method works great when installing LED light strips outdoors. Instead of using 3M tape, we’ll go with LED strip mounting brackets and screws. Just space out the brackets evenly along the strip lights.
Finally, slap on the LED controller and power supplies, flip the switch, and bask in the glow of your LED strip lighting! After reading this installation guide, you’ll be installing LED strips like a total pro.
How to wire led light strips together
Now, if you’re putting LED strip lights on the ceiling, you’re going for that sleek indirect lighting vibe. Let’s say you’ve got a room that’s 15ft by 15ft—you’ll want to connect four 16.4ft LED strips to a controller and run one strip to each corner of the room, linking ’em all up.
How to install led strip light on wall
To get your LED strip lights up on the wall, make sure they’re tucked behind a lip. This way, they stay out of sight but still light up the place real nice, giving it a sleek vibe. Stickin’ LED strip lights on your walls or ceiling can really spruce up the place.
LED strip light ideas
We’re big fans of havin’ LED strip lights under our kitchen cabinets. They add a pop of color and style to what used to be just a plain ol’ white space. And there are tons of other cool DIY ideas for LED lights too. You can slap ’em under cabinets, in bedrooms, behind the TV, in the living room—honestly, the possibilities are endless. Plus, since they’re LED, they don’t get all hot and bothered and they’re super energy-efficient.
Conclusion
LED light strips are versatile as heck. You can use ’em in all sorts of places—rooms, under kitchen cabinets, on TV stands, and shelves. Just follow the tips in this guide, and you’ll have ’em up and runnin’ in no time. As long as you install ’em right, they’ll make your space look real snazzy.